Item statistics, univariate frequency distributions, or conversions that need to be imported for analysis purposes or A&A in GENASYS should still be imported there, rather than PARcore. Statistics and conversions imported to GENASYS will be available in PARcore and (if applicable) the IBIS Application , but statistics/conversions imported to PARcore do not flow backward to GENASYS.
Preparing Data for Import
The following preparation work is required prior to importing data.
1. Determine what statistical values will be provided by the client and or/vendor.
a. Import logic will trim spaces for numeric and character fields if they exist in the import file.
2. Determine what "context" (e.g. Administration, Form Code, Run Date, etc.) will be provided for each set of statistics.
a. The Program and Test code need to exist in PARcore.
3. Determine which statistics will appear on any IBIS® Application screen and/or report.
a. Use the Item Statistic Hierarchy for the list of available statistics in PARcore.
4. Determine how client/vendor statistics will be mapped to existing statistics supported by PARcore.
5. Determine if any new statistic definitions are required in PARcore.
a. If new statistics are required, you will need to enter a ServiceNow incident with the requirements needed.
6. Create a Layout for the data that will be imported (if not using the system defined layout).
a. Response-based statistics will need to use the row-based system defined layout.
Importing Dimensional Level Item Statistics
Importing dimensional level item statistics is supported for item detail statistics (ID, e.g., AIS, Delta) and response detail statistics (RD, e.g., distractor level statistics; NResp, PcntChooseResp), for each dimension. The dimension ID is specified in the "Item Dimension Identifier" context field in the layout, which can be a length of 20 characters.
To import dimension level statistics, the selected layout must include the “Item Dimension Identifier” context field and the import file must have the dimension ID specified in the corresponding row. If a value is specified in the “Item Dimension Identifier” context field, then the statistics being imported for that row are for the dimension of an Item. The “Item Dimension Identifier” context field value should be left blank if the statistics associated are for the overall Item.
Importing Part Level Item Statistics
Importing multi part item statistics is supported for part level item statistics for objectively scored composite items and composite CR items. Multi part item statistics can be item detail statistics (ID) and response detail statistics (RD; e.g., distractor level statistics; AIS and NResp). The part ID is specified in the “Item Part Identifier” context field in the layout which can be a length of 20 characters.
To import part level statistics, the selected layout must include the “Item Part Identifier” context field and the import file must have part ID specified in the corresponding row. If a value is specified in the “Item Part Identifier” context field, then the statistics being imported are for the part of an Item. The “Item Part Identifier” context field should be left blank if the statistics associated are for the overall item.
Importing Item Comment Statistics
Item Comments that are imported will be stored as statistics and flow to the IBIS application as true item comments in the Launch Item Analysis module as well as in the comments for the Item within the content version the comment was associated to.
Note:
- Imported item comments cannot be directly edited or deleted in the IBIS application.
- Importing item comments for a synthetic admin will pass the comments to the IBIS application for the synthetic admin context and for each constituent admin context.
- If importing statistics to a dummy admin context, item comments will not be passed to IBIS as there is no way for the system to identify the package the items are associated with.
1. Format of Item Comments in the import file:
- Item comments need to be within quotes (e.g., "Item Comment 1.") and cannot contain the special characters in parentheses ( < & > ' ") . In the event of multiple comments for an item:
- To display as a single string, put all comments within one set of quotes (e.g., "Item Comment 1. Item Comment 2.")
- To have each comment saved and displayed separately:
- For column-based files - use a caret ^ symbol as the delimiter within quotes (e.g., "Item Comment 1.^ Item Comment 2.")
- For row-based files - each comment should be on a separate row in the Stat_Val field with the corresponding Stat_Val_Seq field populated with the sequence order the comment should be saved as
- If the formatting in the import file does not match the conventions above, comments will be saved to the database incorrectly and will not display as expected.
- Item Comments tagged as PIA will be visible in the PIA category
- Item Comments tagged as FIA will be visible in the FIA category
- Item Comments that are not tagged as PIA or FIA will not be visible in Launch Item Analysis and will only be visible within the Item Comments in the Statistics Category with no subcategory value
Importing Item Statistics
Select the Import tile on the Landing Page or from the Main Navigation select Data and Import
- The Import & Exports page will display with the Import tab selected
- Select the appropriate options for the following fields:
- Purpose
- Item Level Statistics - Columns: If you are using a user defined layout (CSV (Comma delimited) files)
- Note that the user defined layout must be saved with the "CSV (Comma delimited)" extension. Saving the file to a different comma delimited extension, such as "CSV UTF-8 (Comma delimited)" may result in errors when importing.
- Item Level Statistics - Rows: If you are using a system defined layout (Excel (xls, xlsx) files; e.g., Import file from IA/DIF tool)
- Item Level Statistics - Columns: If you are using a user defined layout (CSV (Comma delimited) files)
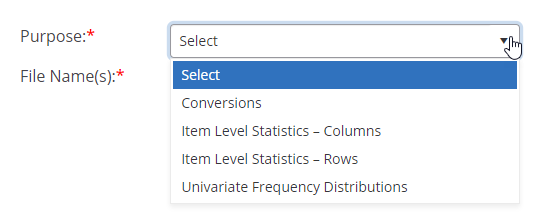
- File Name(s): Choose the item statistics file(s) that you want to import based on the selected Layout
- The file name will be saved as the Description associated to this request, once the Job is complete.
- If multiple files are selected, each file will have its own Job #.
- Layout: If Item Level Statistics - Columns is selected as the purpose, then provide the corresponding layout for the file(s) you are importing.
- Bypass Multi-Dimensional/Multi-Part Item Data Validation: Select this option to bypass the import item statistics validation for Multi-Dimensional or Multi-Part items where the items that need statistics imported are in draft AU/packages and have not been loaded to Test Info Service. The following validations will be bypassed during the import process:
- The admin specified should exist in Test Info Service for the specified program/test
- The dimension ID specified should exist in Test Info Service
- The part ID specified should exist in Test Info Service
- Merge Item Statistics into Existing Context: This option is available if Item Level Statistics - Columns is selected as the purpose. If new statistics are calculated by external processes or supplied by external vendors for items that were previously analyzed and had statistics saved to the Statistics service, select this option if you want to merge the new statistics with the corresponding existing statistics. All statistics would then be available for future analyses performed in PARcore or to other applications (e.g., IBIS Application) that request statistics from PARcore.
- Enter the Request Number that you want to merge the new statistics with and select the Search Request Number button
- Select the radio button next to the appropriate Request ID

3. Select the Import or Merge button
• Each row in the data file is validated. If errors are found, there will be an error file to download from the Job Details page.
View Import Job
Once an Import or Merge job has been submitted, you will be taken to the Jobs tab.
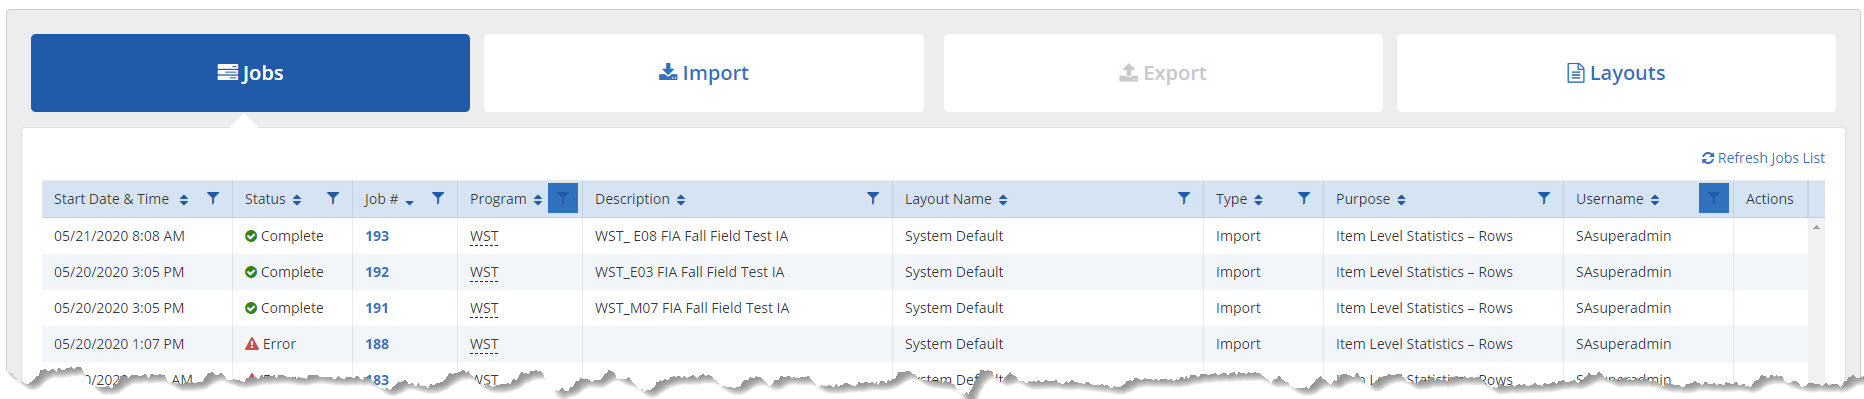
1. The following is a list of possible Status values (select Refresh Jobs List to refresh the jobs status):
• Complete - The import and migration of statistics to SRR was successful.
• Imported - The import was successful, but the migration of statistics to SRR failed. A ServiceNow incident will need to be entered to resolve the failed migration of item statistics to SRR.
• Error - The import failed due to validation errors.
2. When your job has finished and has a Status value of Complete or Error, you will receive an Alert notification in the Global Navigation Alerts.
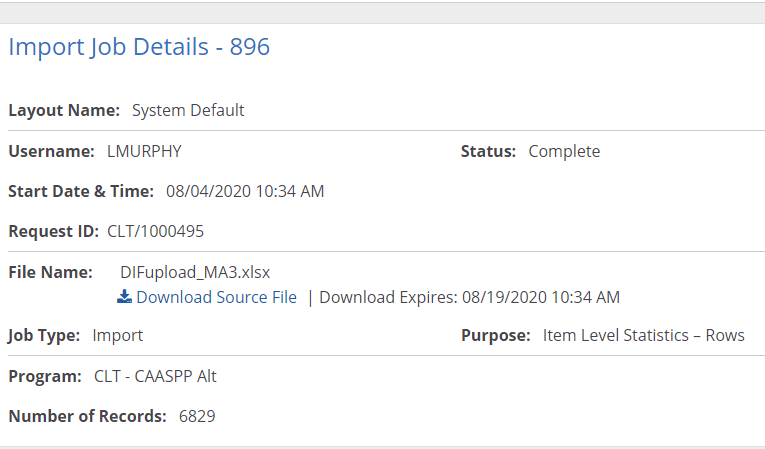
Import Job Details
Once an Import or Merge job has finished, select the Job # link on Jobs tab to take you to the Job Details page. The Job Details displays the following:
• If any import errors were found, an error message will display at the top with a link to download the Error File.
• Layout Name
• Username
• Status
• Start Date & Time
• Request ID - A Request ID will be generated if the import was successful; For a Merge, this will be the Request ID the statistics were merged with.
• Import File Name and a link to download the source file
• Job Type
• Purpose
• Number of Records - The number of statistics that were imported.
Any PAR user with access to the program the import job was run under will have access to the download file(s). The ability to download the files expires two weeks after the Job Start Date.